Kettlebells and Back Pain: Safe Loading Progressions
How to use kettlebell training therapeutically for back pain — which movements load the spine favorably, which to avoid, and a progressive introduction framework.
Why Kettlebells Belong in Back Rehabilitation
The kettlebell has a reputation problem. Many people with back pain are told to avoid it entirely, yet a well-coached kettlebell practice is arguably one of the most therapeutically valuable tools available. The reason comes down to what kettlebells demand: they require whole-body tension, a well-organized neutral spine, and coordinated hip mechanics — exactly the skills that back pain rehabilitation is trying to build.
The key is sequencing. A kettlebell placed in the hands of someone who cannot yet hip-hinge, brace their spine, or produce force from their hips is a liability. The same bell in the hands of someone who has earned those skills becomes a powerful loading tool that builds spinal resilience, posterior chain strength, and the movement confidence that chronic pain erodes.
This article outlines which kettlebell movements load the spine favorably, which to avoid, and how to introduce them progressively.
The Hip Hinge: Everything Starts Here
No kettlebell training should begin before you can hip hinge. The hip hinge — pushing the hips backward while maintaining a neutral spine and minimal knee bend — is the foundation of every productive kettlebell exercise for the back. It is the movement that transfers load to the glutes and hamstrings and away from the lumbar discs and facet joints.
The most common error is squatting the hinge. When the hips drop and the knees dominate, the torso becomes more vertical, the pelvis posteriorly tilts under load, and the lumbar spine rounds. This places high flexion stress on the disc exactly when load is being applied — a reliable way to aggravate most back conditions.
A clean hip hinge looks like this: the hips travel backward several inches before any knee bend occurs. The torso tilts forward to roughly 45 degrees or more, the chest stays proud, and a mild abdominal brace is maintained throughout. Think of pushing the wall behind you with your buttocks, not squatting to sit in a chair.
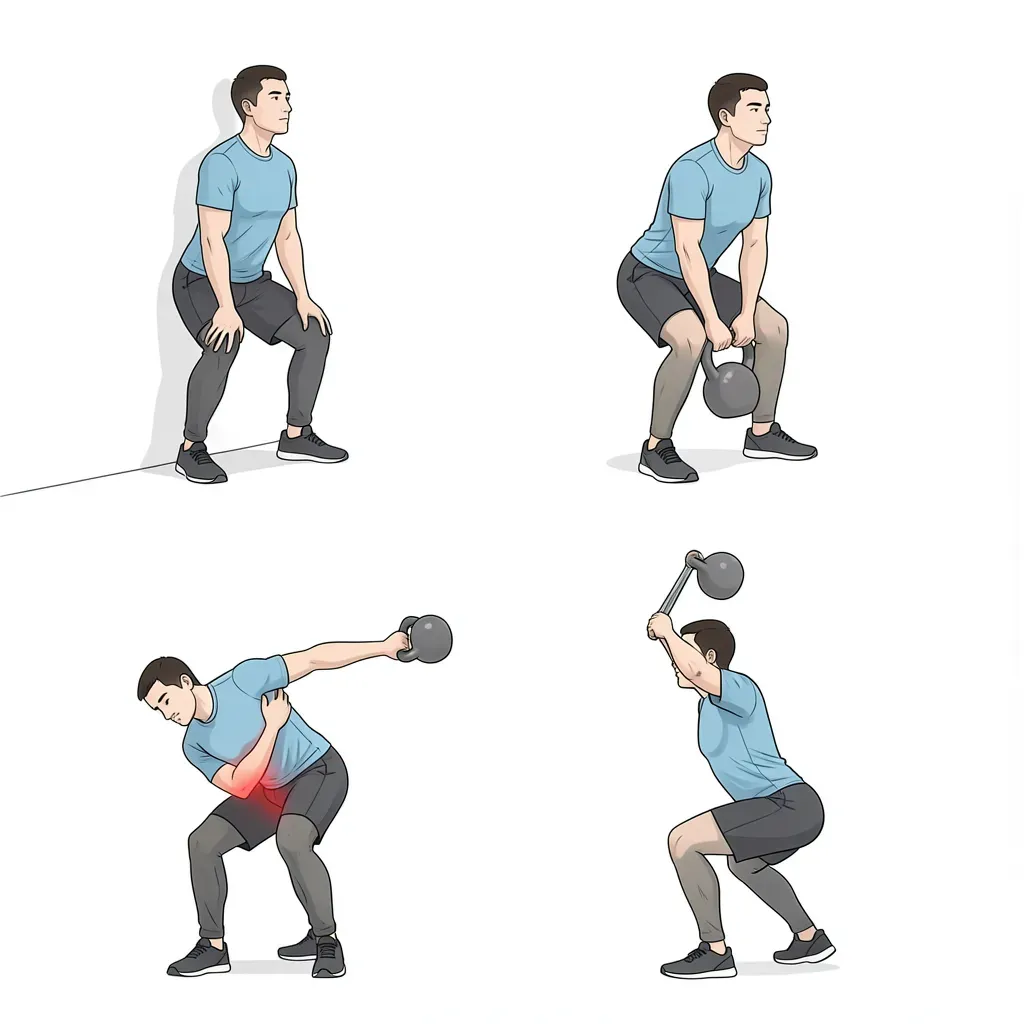
To groove the pattern before adding load, stand one foot from a wall. Push your hips back until they touch the wall, then return. Repeat. When this feels natural and the low back stays neutral throughout, you are ready to hold a kettlebell.
Test your hinge pattern before adding any load by using a dowel rod held along your spine. Three contact points — back of head, between shoulder blades, and sacrum — should all maintain contact during the hinge. Loss of contact at the sacrum means posterior pelvic tilt and lumbar flexion are occurring.
The Kettlebell Deadlift
The kettlebell deadlift is the first loaded movement to master. The bell sits on the floor between and slightly in front of your feet. You hinge to reach it, grip it, brace your spine, and stand — that is the entire movement.
What makes the deadlift therapeutic for the spine is the nature of the load. Picking up a moderately heavy weight from the floor with a neutral spine places the spine in compression — a load the healthy disc and vertebral end-plates are well-designed to tolerate. It strengthens the erector spinae, multifidus, and gluteal muscles under realistic conditions. Research from McGill's lab and others consistently shows that the deadlift pattern, performed with a neutral spine, is associated with low spine loads compared to flexion-based exercises performed with comparable loads.
Start with a light bell (8–12 kg for most adults). The bell should feel easy to move — the focus is entirely on form, not effort. Perform 5 sets of 3 repetitions with complete recovery between sets. Each rep is treated as a separate event: set up, brace, lift, lower, reset. Never rush between reps when learning.
Progression follows a simple rule: when form is reliable across all reps of a session for two consecutive sessions, add a small amount of load or add one rep per set.
The Kettlebell Swing
The swing is the centerpiece of kettlebell training and the movement with the most direct carryover to back rehabilitation. Done correctly, it is a ballistic hip hinge — the hips load and then explosively drive forward, projecting the bell. The spine remains neutral throughout and is exposed to rapid cycles of loading and unloading that improve posterior chain power and spinal resilience.
The therapeutic value of the swing comes from its demands: it requires the same neutral spine mechanics as the deadlift but adds a dynamic element that teaches the body to produce and absorb force without spinal flexion. For patients who have recovered basic stability but need to build genuine athleticism and load tolerance, the swing is exceptional.
A critical technical point: the bottom of the swing is a hinge, not a squat. The bell travels back between the legs because the hips push back sharply, not because the knees drop. If the knees are tracking forward as the bell drops, the pattern has converted from a hinge to a squat and lumbar flexion is likely occurring.
Begin with a 12–16 kg bell for most adults. Practice 5 sets of 5 swings, focusing entirely on the hip snap at the top and the hinge pattern at the bottom. As pattern quality improves, increase sets and reps before increasing load.
Do not attempt the kettlebell swing if you are in an acute pain flare, if you cannot yet perform a clean hip hinge with a light deadlift, or if you experience symptoms radiating into the leg during the movement. The swing involves significant spinal loading and should only be introduced once basic stabilization work is well-established.
The Turkish Get-Up
The Turkish get-up is unlike any other kettlebell movement. It is a slow, deliberate sequence of transitions from lying on the ground to standing and back down, performed with a kettlebell held overhead. At first glance it appears complex; in a rehabilitation context it is profoundly valuable.
What makes the get-up therapeutic is that it takes the spine through multiple stable positions under load — rolling, tall sitting, bridging, half-kneeling, and standing — while requiring the shoulder girdle to stabilize overhead weight and the core to maintain spinal alignment throughout. It builds rotary stability, hip mobility, and the kind of whole-body coordination that is directly relevant to real-world function.
For back pain patients, the get-up is often introduced before the swing because it is slow and controlled, and because it directly addresses the thoracic stiffness, hip mobility limitations, and rotary stability deficits that commonly accompany chronic low back pain.
Begin with no weight — just a closed fist or a shoe balanced on the back of the hand. Master the transitions before adding any load. When you can move through all positions smoothly without losing spinal alignment, introduce a very light bell (4–8 kg). One get-up per side per session is sufficient initially.
Halos and Presses
Halos involve rotating a kettlebell around the head and are one of the safest ways to build thoracic rotation and shoulder mobility. They are performed kneeling or standing and do not load the spine directly. For patients with thoracic stiffness — common in those with prolonged desk postures — halos are a practical addition to warm-up or recovery sessions.
The overhead press with a kettlebell is appropriate for patients who have progressed past the basic rehabilitation phase. Pressing overhead requires good thoracic extension and lumbar stability; if the thoracic spine is stiff, the lumbar spine will hyperextend to complete the motion, which can aggravate facet joints or existing stenosis. Before pressing overhead, ensure thoracic extension is adequate by testing if you can extend over a foam roller without the low back compensating.
Begin pressing from a half-kneeling position, which reduces the degree to which the lumbar spine can compensate. Progress to standing only when half-kneeling pressing is pain-free and technically clean.
The half-kneeling position is not just a regression — it is a genuine training position that simultaneously trains hip flexor length, pelvic position, and overhead stability. Many coaches use it as the primary pressing position indefinitely, not just as a stepping stone.
What to Avoid
Several popular kettlebell exercises are poorly suited for back pain patients and should either be removed or carefully reconsidered:
The Russian twist — performed sitting on the floor with the feet raised and the torso rotating side to side — combines lumbar flexion with rotation, which is among the most damaging load combinations for the lumbar disc. The psoas is maximally active in this position, creating significant compressive loads on the lumbar spine. This exercise has almost no place in a back rehabilitation program.
Overhead pressing with lumbar hyperextension — common when thoracic stiffness causes lumbar compensation. If you cannot get the bell overhead without your low back arching excessively, the movement is loading your lumbar facets beyond what is appropriate.
High-repetition swings with a fatigued pattern — the swing is safe when form is maintained. When fatigue causes the hinge pattern to collapse into a squat or the lumbar spine to round under load, the therapeutic benefit reverses. Always end swing sets before form degrades.
Windmills and bent presses in early rehabilitation — these are advanced movements that require significant hip mobility and thoracic rotation. They are not inherently dangerous but are inappropriate until advanced stability and movement quality are established.
A Progressive Introduction Framework
The framework below assumes you have completed basic stability work (Big 3 equivalents) and can walk pain-free for 20–30 minutes.
Phase 1 (Weeks 1–3): Pattern Establishment
- Unloaded hip hinge (wall touch drill): 3 sets of 10 reps
- KB deadlift (light): 5 sets of 3 reps
- Turkish get-up (no weight): 3 per side
Phase 2 (Weeks 4–6): Loading Introduction
- KB deadlift (moderate): 4 sets of 5 reps
- KB swing (light, 5 reps per set): 5 sets
- Turkish get-up (light bell): 2–3 per side
Phase 3 (Weeks 7–10): Volume and Intensity
- KB swing: 5 sets of 10
- KB deadlift: 4 sets of 5 with progressing load
- Half-kneeling press: 3 sets of 5 per side
- Turkish get-up: 5 per side
Progress within each phase only when movement quality is consistent. If pain increases above baseline during or after a session, reduce load and volume before progressing.
In Review
- The hip hinge pattern — not the squat — is the foundation of every therapeutic kettlebell exercise; establish it before adding any load
- The kettlebell deadlift teaches the spine to tolerate compressive loads in a neutral position, building posterior chain strength directly relevant to back rehabilitation
- The swing is a ballistic hip hinge that builds posterior chain power and spinal resilience, but requires clean hinge mechanics as a prerequisite
- The Turkish get-up builds rotary stability, hip mobility, and whole-body coordination in a controlled, slow format ideal for early progressive loading
- Halos and half-kneeling pressing address thoracic mobility and overhead stability without excessive lumbar loading
- The Russian twist and high-load overhead movements with lumbar compensation should be removed from the program of anyone with active back pain
- Progression is driven by movement quality, not schedule — adding load or volume before the pattern is reliable reliably produces setbacks
- Kettlebell training done correctly is not a risk for back pain patients; it is one of the most biomechanically sound tools for building the strength and movement confidence that recovery requires